
Use Microsoft Intune to deploy the Imprivata Locker Android app with the Managed Home Screen (MHS).
Deploying the Imprivata Locker Android app with Intune’s Managed Home Screen (MHS) is supported only on corporate-owned, dedicated devices. It is not supported on corporate-owned, fully managed devices.
NOTE: For detailed information on configuring Microsoft Intune policies, profiles, and groups, see the Microsoft Intune documentation.
Screenshots of some Intune interfaces are included as an aid to configuration, but the deployment steps in this topic may change in future, as Microsoft make changes to the Intune admin console.
Before You Begin
Before you begin, configure the following prerequisites:
- Enroll the Android devices in Microsoft Intune.
- Register the Imprivata Locker app (Android) to Microsoft Intune.
Step 1: Create an Enrollment Profile
In the Intune admin console, create an enrollment profile for the Android devices.
- Navigate to Intune Admin Console > Devices |Android > Android Enrollment > Corporate-owned dedicated devices.
- Click Create profile and enter the following information:
- Name. Type a name for the profile.
- Description. Add a profile description.
- Click Next and Create to create the policy. Intune generates a token for enrollment.
- In the Token section, click Show token to display the device enrollment token (an eight-digit string) and a QR code for your Intune tenant. This single enrollment token is valid for all of the users and won’t expire.
- Copy the enrollment token to send to your end users, or post it to your helpdesk to enable end users to enroll their devices.
Step 2: Create a User Group
In the Intune admin console, create a user group for the devices.
- Create a user group for the devices.
- Associate the group with the new enrollment profile that you created.
- In the Dynamic membership rules section, in the Rules syntax, add the rule syntax with the name of the new enrollment profile. For example, (device.enrollmentProfileName -eq”LockerAndroid dedicated”).
Step 3: Create a Device Configuration Profile
Create a device configuration profile for corporate-owned dedicated devices running in multi-app kiosk mode with the Managed Home Screen app.
- In Devices > Android > Configuration profiles, create a profile for the dedicated devices.
- In the Device experience section, configure the following settings for dedicated devices:
- For Enrollment profile type, select Dedicated device.
- For Kiosk mode, select Multi-app. This allows users to access a limited set of apps on the device. When the device starts, only the apps you add start. When the policy is applied, users see icons for the allowed apps on the home screen.
- For Custom app layout, click Enable.
- In the Home Screen section, specify the apps to use with the Managed Home Screen:
- Add the Managed Home Screen app.
- Add the Imprivata Locker Android app.
- Add other apps, such as Epic Rover; Google Chrome, etc.
- For MSAL-managed Microsoft apps, such as Microsoft Teams, add the Microsoft Authenticator app.
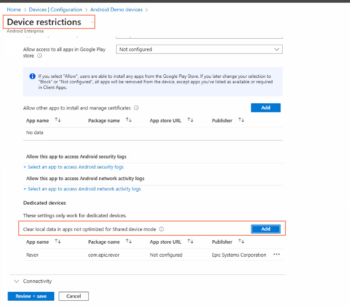
Step 3a: Configure Managed Home Screen to Clear All Local from Apps Not Optimized for Shared Device Mode
To configure Managed Home Screen to clear all local data from apps on check in:
- In your device configuration profile, in the Device restrictions/Applications/Dedicated devices/Clear local data in apps not optimized for shared device mode section, add the apps you want to log out of when the device is checked in, so that Managed Home Screen will clear all local data.
- For apps that are not managed by MSAL, click Add to add the apps. This can include Google Chrome, Epic Rover, and so on.
Example
- Click Review + save.
- For apps that are not managed by MSAL, click Add to add the apps. This can include Google Chrome, Epic Rover, and so on.
- Assign the device configuration profile to the user group you created earlier.
Step 3b: Configure Epic Rover Settings
The Epic Rover app requires configuration settings that would be lost during a “clear all local data” action, so you must set up a separate configuration policy for it.
- In App > App configuration policies, click Add to add an app configuration policy.
- From the Targeted app list, select the Epic Rover app.
- In the Properties > Configuration settings section, add a Configuration key for the Epic app:
- Configuration key: Econfig URL
- Value type: String
- Configuration value: epicrover://handheld/config/<keyFromEpicRover>, where the <keyFromEpicRover> value is obtained from Epic.
Epic is a registered trademark of Epic Systems Corporation.
Step 3c: Configure a Session PIN
Optional.
You can allow users to get prompted to create a local Session PIN after they’ve successfully signed into the Managed Home Screen. The Session PIN will appear before the user gets access to the home screen, and can be used in conjunction with other features.
- The Session PIN lasts until the device is checked in to GroundControl; at this time the Session PIN is cleared.
- When the device is checked out again, the new user is prompted to enter a new Session PIN.s
- If the device is rebooted, the device is locked and displays a screen directing the user to return the device to a dock.
To configure a Session PIN:
- In Devices > Policy > Configuration Profiles, create the profile and assign it to your device, as you did in Step 3.
- Under device experience, enable Screen Saver Mode, and set the timeout period as desired.
- Go to Apps > Configuration Policies and update the managed device policy for the Managed Home Screen app. Set the following configurations keys to TRUE.
-
- Enable sign in
- Enable screen saver
- Enable session PIN
- Require PIN code after returning from screen saver
- Assign the new device configuration profile to the user group you created earlier.
Step 4: Enroll Devices
Enroll the devices by scanning the QR code or using the token value obtained earlier. Intune enrollment begins with a factory reset of the device.
To enroll a device:
- Wipe the device by using the full factory reset.
- Turn on the newly reset device.
- On the Welcome screen, select your language.
- Connect to the Wi-Fi, and then click NEXT.
- Accept the Google Terms and conditions, and then click NEXT.
- On the Google sign-in screen, enter afw#setup instead of a Gmail account, and then click NEXT.
- Choose INSTALL for the Android Device Policy app.
- Continue installation of this policy. Some devices may require additional terms acceptance.
- Log in to the Microsoft Intune admin center.
- Browse to Devices > Enroll Devices > Android Enrollment > Corporate-owned dedicated devices.
- Open the enrollment profile created in Step 1.
- Click Token > Show token. On the device Enrollment page, scan the token from the profile. A notification displays that this isn’t a private device. Click Next.
- In the next enrollment phase, the work apps are installed. Click Install. After the required apps are installed, click Next.
- Click Set up to register the device. When the registration is complete, click Done.