IMPORTANT: GroundControl 6.2 and later no longer support the GroundControl Locker 2 app for iOS devices. You must upgrade to the Imprivata Locker app 3 and later for iOS devices. Imprivata ended support of GroundControl Locker 2 in January, 2022. New iOS workflows will no longer require selecting an app version. Existing workflows are unaffected, though Check In workflows with Locker 2 will no longer be supported.
Overview
Imprivata GroundControl includes a completely rewritten Locker app for iOS, with a new, modern UI. Most importantly, when paired with Imprivata OneSign’s access management system, Imprivata Locker for iOS can AutoFill passwords into many iPhone and iPad apps.
This guide for GroundControl admins documents how to upgrade from GroundControl Locker 2 to Imprivata Locker for iOS 3, how to downgrade if needed, and how to enable Password AutoFill. Note: You do not need to erase devices to perform the upgrade.
Locker versions
GroundControl Locker 2 and Imprivata Locker 3 are distinct apps. You can have both installed on your devices at once. This is recommended for an orderly transition.
Obtain the App from ABM/ASM
Like GroundControl Locker 2, Imprivata Locker 3 is distributed through Apple Business Manager (ABM) and Apple School Manager (ASM) as Custom Apps. You must “purchase” Imprivata Locker 3 from ABM/ASM, even if you have already obtained GroundControl Locker 2.
Once purchased, you will use your MDM to sync with ABM/ASM, and assign the app to your device groups. Again, this is a repeat of the procedure you used for Locker 2.
- IMPORTANT: Do not unassign Locker 2 from any devices at this time.
You can assign Locker 3 to the same groups as you assign Locker 2. Alternatively, you can assign Locker 3 to a test group, and later expand to all your devices.
Additionally, copy any AppConfig settings you use to personalize Locker 2 to Locker 3, for example UnlockPIN.
Update your notification profile
Just as with Locker 2, it is critical to have Locker 3 in your MDM’s notification profile. Edit the notification profile to set notifications for Locker 3 — com.imprivata.b2b.locker. Use defaults. Do not create multiple notification profiles in your MDM, as iOS devices limit you to a maximum of one profile. It is acceptable to set the notification for Locker 3 even if Locker 3 is not installed on some devices.
Update your home screen app arrangement
Optionally, add Locker 3 — com.imprivata.b2b.locker — to you home screen app arrangement. Some organizations set the app arrangement in GroundControl, and others in MDM. You should keep both Locker 2 and Locker 3 in your app arrangement through the transition process.
Confirm both Locker 2 and Locker 3 are installed on devices
Check out one of your devices, and verify that both the Locker 2 app and Locker 3 app are installed.
- Do not open the Locker 3 app at this time. You haven’t configured it yet.
Clone your “Check In” workflow
We have added an option to GroundControl’s Check In action to switch between Locker 2 and Locker 3. This affects only LOCKING the phone. For convenience, the Check Out action unlocks both versions of the app.
In GroundControl, open the workflow you use for Check In (often called “Check In” or “Return”) and click the Clone button. Name the cloned workflow “Check In (Locker 3)” or similar.
Edit the workflow. The Check In action includes a new control to specify the Locker app version. Change this to “Locker 3 VPP” in your newly-created workflow.
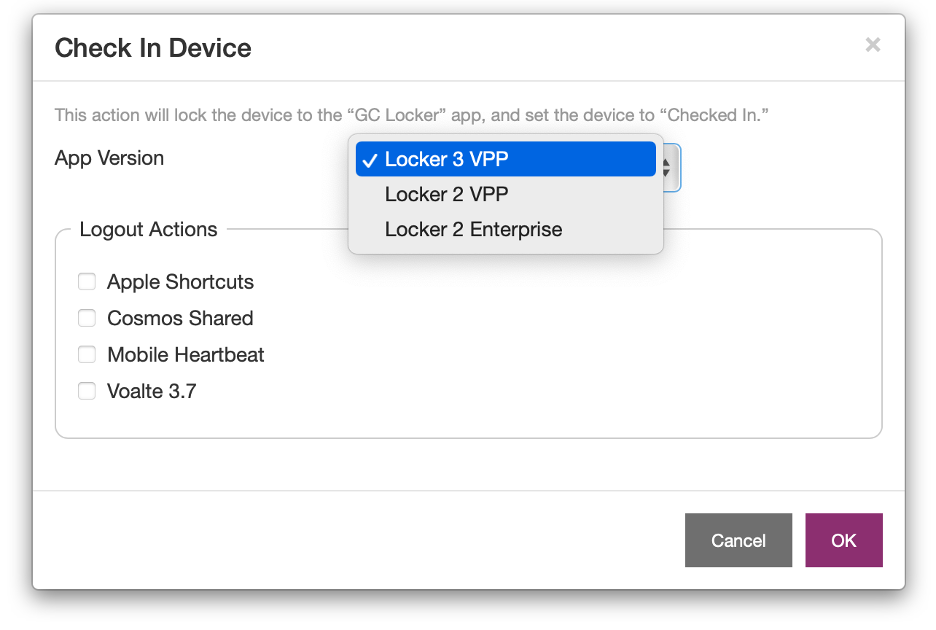
Save the workflow.
We will now set up a special automation rule to test the new workflow on one Launchpad. In the Automation tab, click “New Rule”, and select Checked In as the trigger. Name the rule “Check In (Locker 3)” or similar.
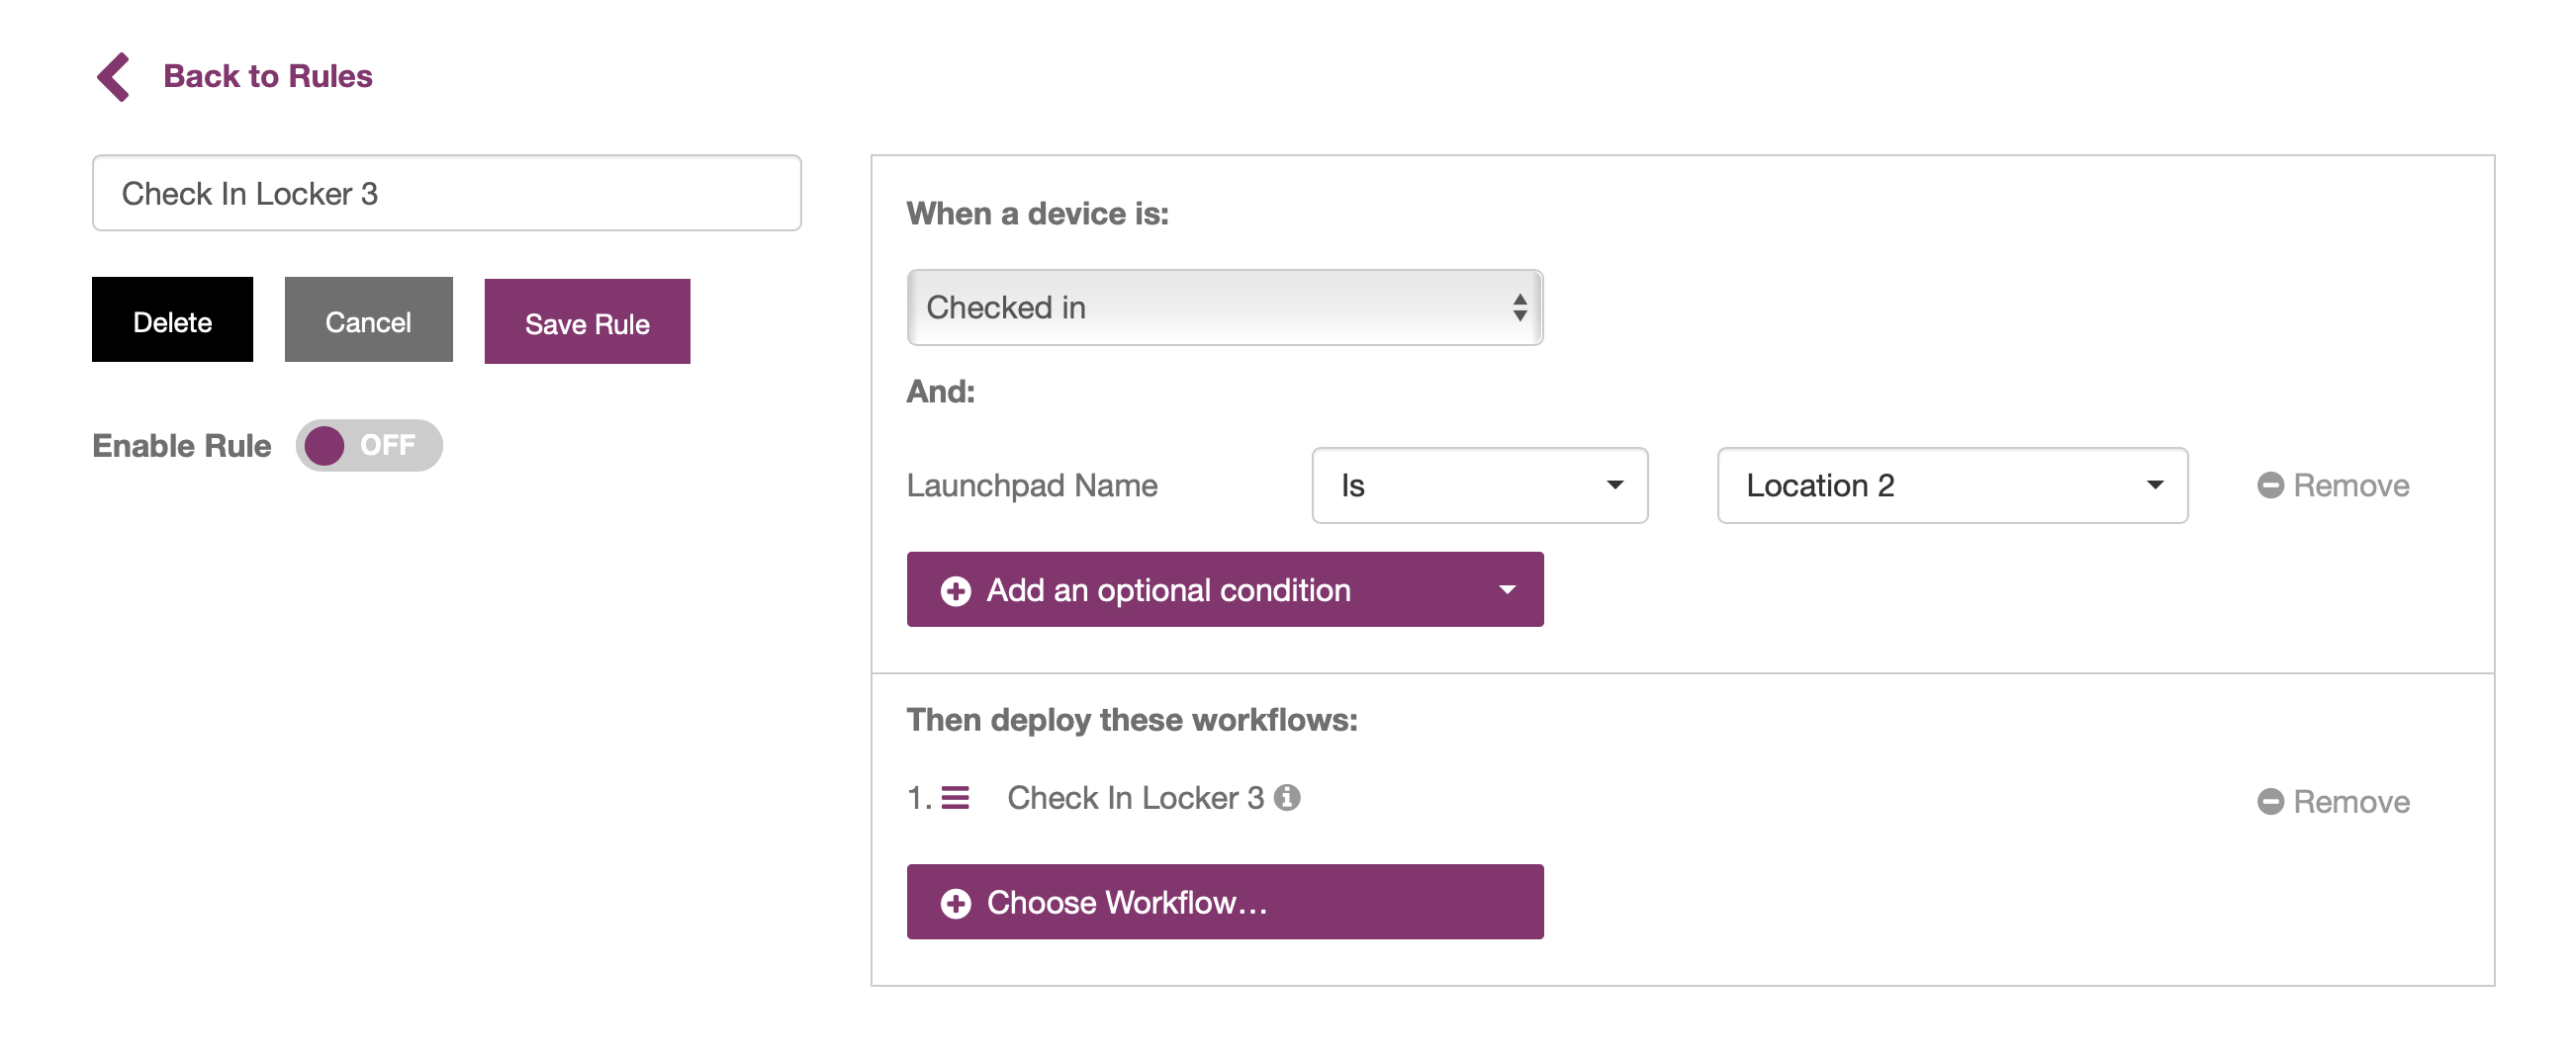
- Add condition specifying a Launchpad is important, so we limit the test.
Set the automation rule to run the new workflow you created “Check In (Locker 3)”, and Save the automation rule. Do not enable the rule yet.
Using your mouse, drag the menu icon to move the new rule to the TOP of your list of rules. This increases the priority of the rule, so it is evaluated before the generic “Check In” rule.
- Do not enable the automation rule at this time.
Test the old and new “Check In Locker 3” workflow
Follow these steps to test your setup:
- Remove all devices but one from your test Launchpad.
- Check Out 1: Tap your badge to check out a device. The device should unlock with the familiar “Locker 2” Unlock screen.
- Disconnect the unlocked device from USB.
- Check In 1: Return the device to the Launchpad. This should lock with the familiar “Locker 2” lock screen.
- Now enable the new automation rule you created previously.
- Check Out 2: Tap your badge to check out another device. You will again see the Locker 2 unlock screen.
- Check In 2: Again return the device to the Launchpad.
- Confirm that the new automation rule and “Locker 3” workflow run
- Confirm that the device locks with the new Locker 3 lock screen.
- Check Out 3: Tap your badge to check out the device.
- Confirm the device unlocks with the new Locker 3 unlock screen.

To test downgrading from Locker 3 to Locker 2, disable the automation rule, and test again. The device should end up first locking, then unlocking, using the Locker 2 app.
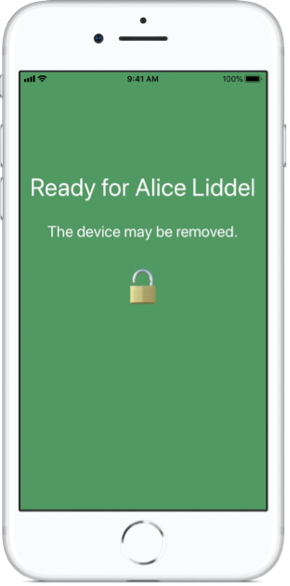
Prepare documentation for your clinical team
As the screens in Locker 3 are different, Imprivata recommends you communicate the change to your staff.
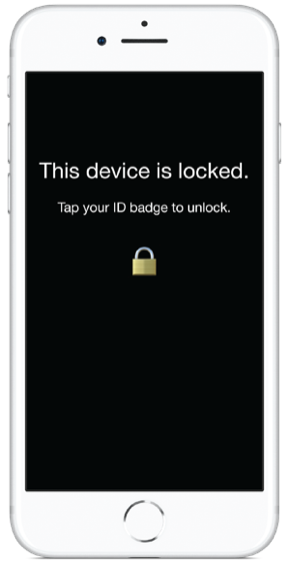
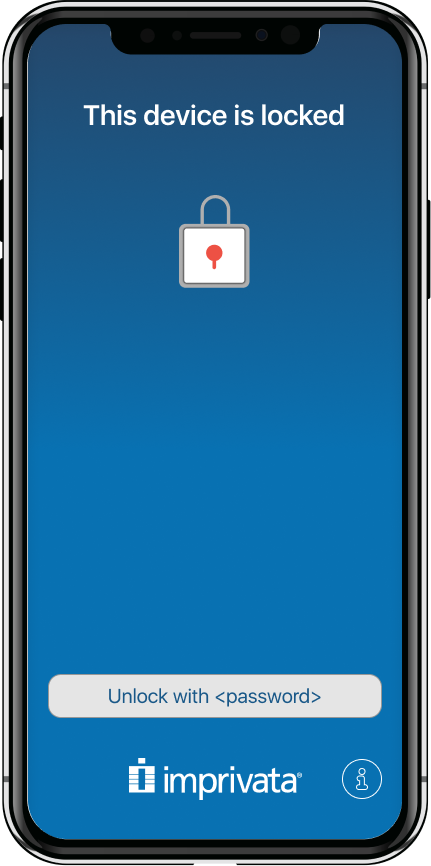
| Unlocked | Locked | |
| Locker 2 | | |
| Locker 3 |  | |
If you are implementing AutoFill at the same time, include those instructions as well. See below for more info.
Migrate your fleet to Locker 3
To migrate your fleet, you need only to change the “App Version” in the Check In workflow action from Locker 2 VPP to Locker 3 VPP.
If you wish to migrate only some of your fleet, you may use Launchpad attributes or Device attributes to add conditions to the automation rule, just as we did during the test above.
AutoFill: Requirements
Locker 3 can use Apple’s Password AutoFill to easily fill in passwords to most apps and web sites. User credentials are retrieved from Imprivata OneSign.
- AutoFill works on iOS 14.1 and newer.
- A currently maintained release of Imprivata OneSign must be in use at your organization.
- Imprivata OneSign SSO licenses for AutoFill users.
- Imprivata OneSign profiles must be uploaded and deployed for each iOS app and website. See this article for more information.
- Devices using AutoFill require access to the Imprivata appliance over the network.
- Check your MDM profiles to make sure you are not restricting password autofill.
- In GroundControl, Admin > Check Out > Authentication method must be set to Proximity Cards.
- In GroundControl, Admin > Check Out > Identity Web Service must be set to Imprivata OneSign (not “Custom”) and any prox-related custom Launchpad attributes must be removed (see below).
- In GroundControl, Admin > Password AutoFill must be enabled, and options set for second factor authentication to match your Imprivata OneSign configuration.
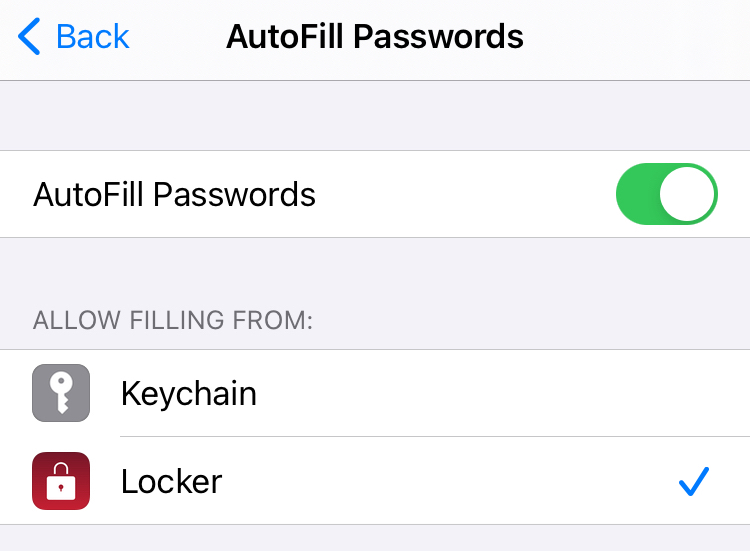
- Each device will need to be set up by hand to use the Imprivata’s AutoFill extension — unfortunately there is no way to do this automatically using MDM or GroundControl. See instructions below:
To enable Password AutoFill on the device, navigate to Settings> Passwords> AutoFill Passwords> Turn ON. Allow filling from Locker, and make sure Keychain is not be checked.
AutoFill: Switch from “Custom” to “Imprivata OneSign” as the Identity Provider
In GroundControl, check Admin > Check Out > Identity Web Service. If your system is set to “Custom” perform the following steps.
- Important: Imprivata strongly recommends testing the change on a GroundControl UAT system prior to changing production. An incorrect setting will disable badge taps for GroundControl.
- In the Imprivata Admin Console, confirm that Imprivata OneSign is set up with the correct API access: “Imprivata Mobile on iOS” for OneSign 7.2+ or “Future 1” for Imprivata OneSign 7.1 and earlier. Some customers may have enabled “Future 9” at some point; Future 9 should remain enabled until you have switched production GroundControl to use the new IdP settings.
- In GroundControl, change Admin > Check Out > Identity Web Service to OneSign.
- Add the hostname of your Imprivata appliance in the dialog.
- If your organization uses a root certificate authority, upload that CA certificate to this dialog, in PEM, CER, CRT, or DER format. Otherwise leave “Disable SSL checks” selected.
- Save the dialog.
- Edit Admin > Launchpads > Custom Options to delete any references to ProxCardWebFormat, ProxCardImprivataProductID, and ProxCardWebCA.
- Restart any Launchpads as prompted.
To test this configuration, in the GroundControl console click the Launchpads tab, then open one of your Launchpads. In Launchpad Actions choose “Test Identity Web Service.”