
The Devices tab allows you to view your inventory of devices and information about them, including their serial number, platform, model and OS, name, last seen date, status, and any associated Attributes.
- Click All Devices to view all of the devices in your organization.
- Click My Smart Folders to view or add a new smart folder that groups your devices based on their attributes. Using Smart Folders allows you to focus on the relevant device information and to filter out the rest. For more information, see Use Smart Folders to Organize Your View.
Hide filters / Show filters
Health metrics filters are displayed by default, as a part of the Dashboard feature.
Click Hide filters to hide the health metrics filters. Click Show filters to view them again.
Device Statuses
There are three device statuses: Active, Pending and Retired.
- Active devices count towards your Mobile Access Management license. A device that has had a successful deployment in the last 12 months counts as Active.
- Pending devices include new devices uploaded via spreadsheet (see below) or added manually. Devices are Pending until their first deployment.
- Pending devices do not use a license.
- Pending devices can be deleted from the system.
- Retired devices do not use a license. Mobile Access Management automatically marks devices as Retired when their 1-year license expires.
You can manually retire a single device that has been lost or stolen, or retire multiple devices uploaded via spreadsheet. This frees up the licenses so they can be used on other devices.
Devices that are Pending or Retired automatically become Active again after a Workflow is once again deployed to them.
Edit Device Details
To edit a device, click on a device row. The Device Details dialog opens.
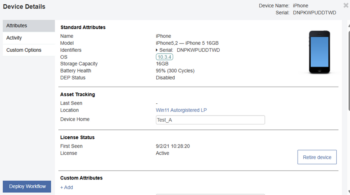
Retire a Single Device
To retire a single device:
- In the Device details dialog, in the License status section, click Retire.
- To indicate a lost or stolen device, click the Lost or Stolen options.
- To specify additional device status, click the Other option, and enter additional details.
- Select Submit to retire the device.
Unretire a Device
In the same fashion that you can retire a device, you can also unretire them.
To unretire a device, under Device Status, click Unretire. This changes the device status from Retired to Active.
Add One Device
To add to the list one at a time, click Add Device. You must add a serial number, and you may enter custom attributes.
Importing Multiple Devices
Requirements for Import
- The first row of the import file is for column headers. The header names are matched to attribute values and are case sensitive.
- You must include a column named Device Serial.
This column is used to match existing devices — updating any columns you include — or to add new pending devices.
When scanning devices, the ‘S’ prefix for the serial number will be removed automatically by Mobile Access Management.
IMPORTANT: The Device Serial column is case sensitive. - Column names are case sensitive.
- You may also import as many Custom Attributes as you wish. Other column headers should match names in your Custom Attributes.
- You may not import built-in attributes, such as Device Model, Device OS, or Device Name.
- Built-in attributes are read-only.
- Any columns matching built-in attributes will be ignored.
- Unrecognized columns are ignored.
Import a List of Devices
To upload a list of device Serial numbers and your Custom Fields:
- On the Devices tab, click Import. The Import CSV dialog opens.
- A CSV template is available for download.
Import a List of Devices to Retire
The feature is only available to Console Admins.
Requirements for List of Devices to Retire
- The first row of the CSV file is for column headers. The header names are matched to attribute values and are case sensitive.
- A column named Device Serial is required.
- A column named Status is required. Set the values in the Status column to Retired. Do not include quotation marks around the Retired value.
- A column named Retired Reason is optional, and can be set to a reason for retiring the list of devices.
- The column named Platform is not used for retiring devices. It is a column generally only used for import.
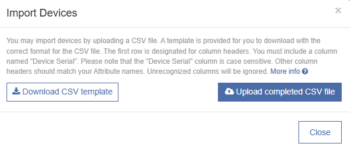
To upload a list of devices to retire:
- On the Devices tab, click Retire Devices and then click Continue. The Import Devices dialog opens.
- Download the CSV template by clicking Download CSV template.
- Edit the CSV template, or create a CSV file for the retired devices based on the downloaded template:
- The column named Device Serial is required. Add the list of device serial numbers to be retired.
- Ignore or delete the column named Platform. This column is not used when retiring devices.
- Add a column named Status and set the value to Retired for the list of devices to be retired.
Do not place quotation marks around the Retired value in the Status column. - Optional. Add a column named Retired Reason and set the value to a reason for retiring the list of devices.
Example

- Click Upload completed CSV file and select your updated file.
When complete, the summary count of total devices processed and retired is displayed. The system sends an email with a summary count of retired devices to the user who initiated the bulk retirement.
If the CSV file is missing data, or there is a problem, MAM displays an error message indicating what the issue is.
Import Custom Device Names
Built-in attributes, such as Device Name, are read-only.
To import unique names for devices:
- Create a new device attribute called, for example, “Custom Name”.
- Create a spreadsheet with a column named Device Serial and a column named Custom Name.
IMPORTANT: The Device Serial column is case sensitive. - Enter your data into the sheet, save, and import into Mobile Access Management.
- In your workflow, use the Set Name action and set the value to the attribute “[Custom Name]”. Ensure that you include the square brackets.
Export Devices
To export a list of the devices in your Mobile Access Management account, in the Devices tab, click Export.
- The exported CSV file contains information about your devices, and a list of built-in and custom attributes.
- If you filtered the Devices list, the CSV contains the results from your filter.
- Many customers use the exported file to create custom reports.
Deploy Workflows in Bulk to Devices
To deploy a Workflow in bulk to a set of devices:
- On the Devices tab, click Bulk Deploy.
- Select the appropriate devices and click Deploy to Selected.
- Select the appropriate Workflow for your devices:
- DEP Workflows are only eligible connected iOS devices.
- Non-DEP Workflows are only eligible for connected iOS devices.
- Android Workflows are only eligible for connected Android devices.
- Over-the-air (OTA) Workflows are eligible for all device types and connection statuses.
- Click Deploy.
NOTE: Deploying Workflows to a large number of devices may take an extended amount of time.